Mastering JavaScript DOM
A Deep Dive into Document Object Model Manipulation

Hey 👋🏻,
I am Arindam Majumder, a Software Engineer from India. I am interested in, write about, and develop (open source) software solutions for and with Next.js, JavaScript, ReactJs, and Python.
📬 Get in touch
Twitter: twitter.com/Arindam_1729 Blog: dev.to/arindam_1729 YouTube: youtube.com/@Arindam_1729 LinkedIn: linkedin.com/in/arindam2004 GitHub: github.com/Arindam200
📧 Sign up for my newsletter.
Introduction:
DOM is the backbone for building dynamic, responsive, and interactive web applications.
In this Article, We'll explore What is DOM ( Document Object Model ), its Structure, How to access DOM elements, Manipulate them and many more...
Excited?
Me Too!
So without delaying Further, Let's START!
What is DOM?
The word "DOM" stands for Document Object Model.
The DOM is a Web API that directly interacts with HTML elements and changes/manipulates them. It's a reliable way to make changes that turn static websites into dynamic ones.
DOM Structure:
The DOM represents an HTML document as a hierarchy of nodes.
Let's take a simple HTML code:
<!DOCTYPE html>
<html>
<head>
    <title>DOM Example</title>
</head>
<body>
    <h1>Hello, DOM!</h1>
    <p>This is a paragraph.</p>
</body>
</html>
The Tree representation of this code will be :
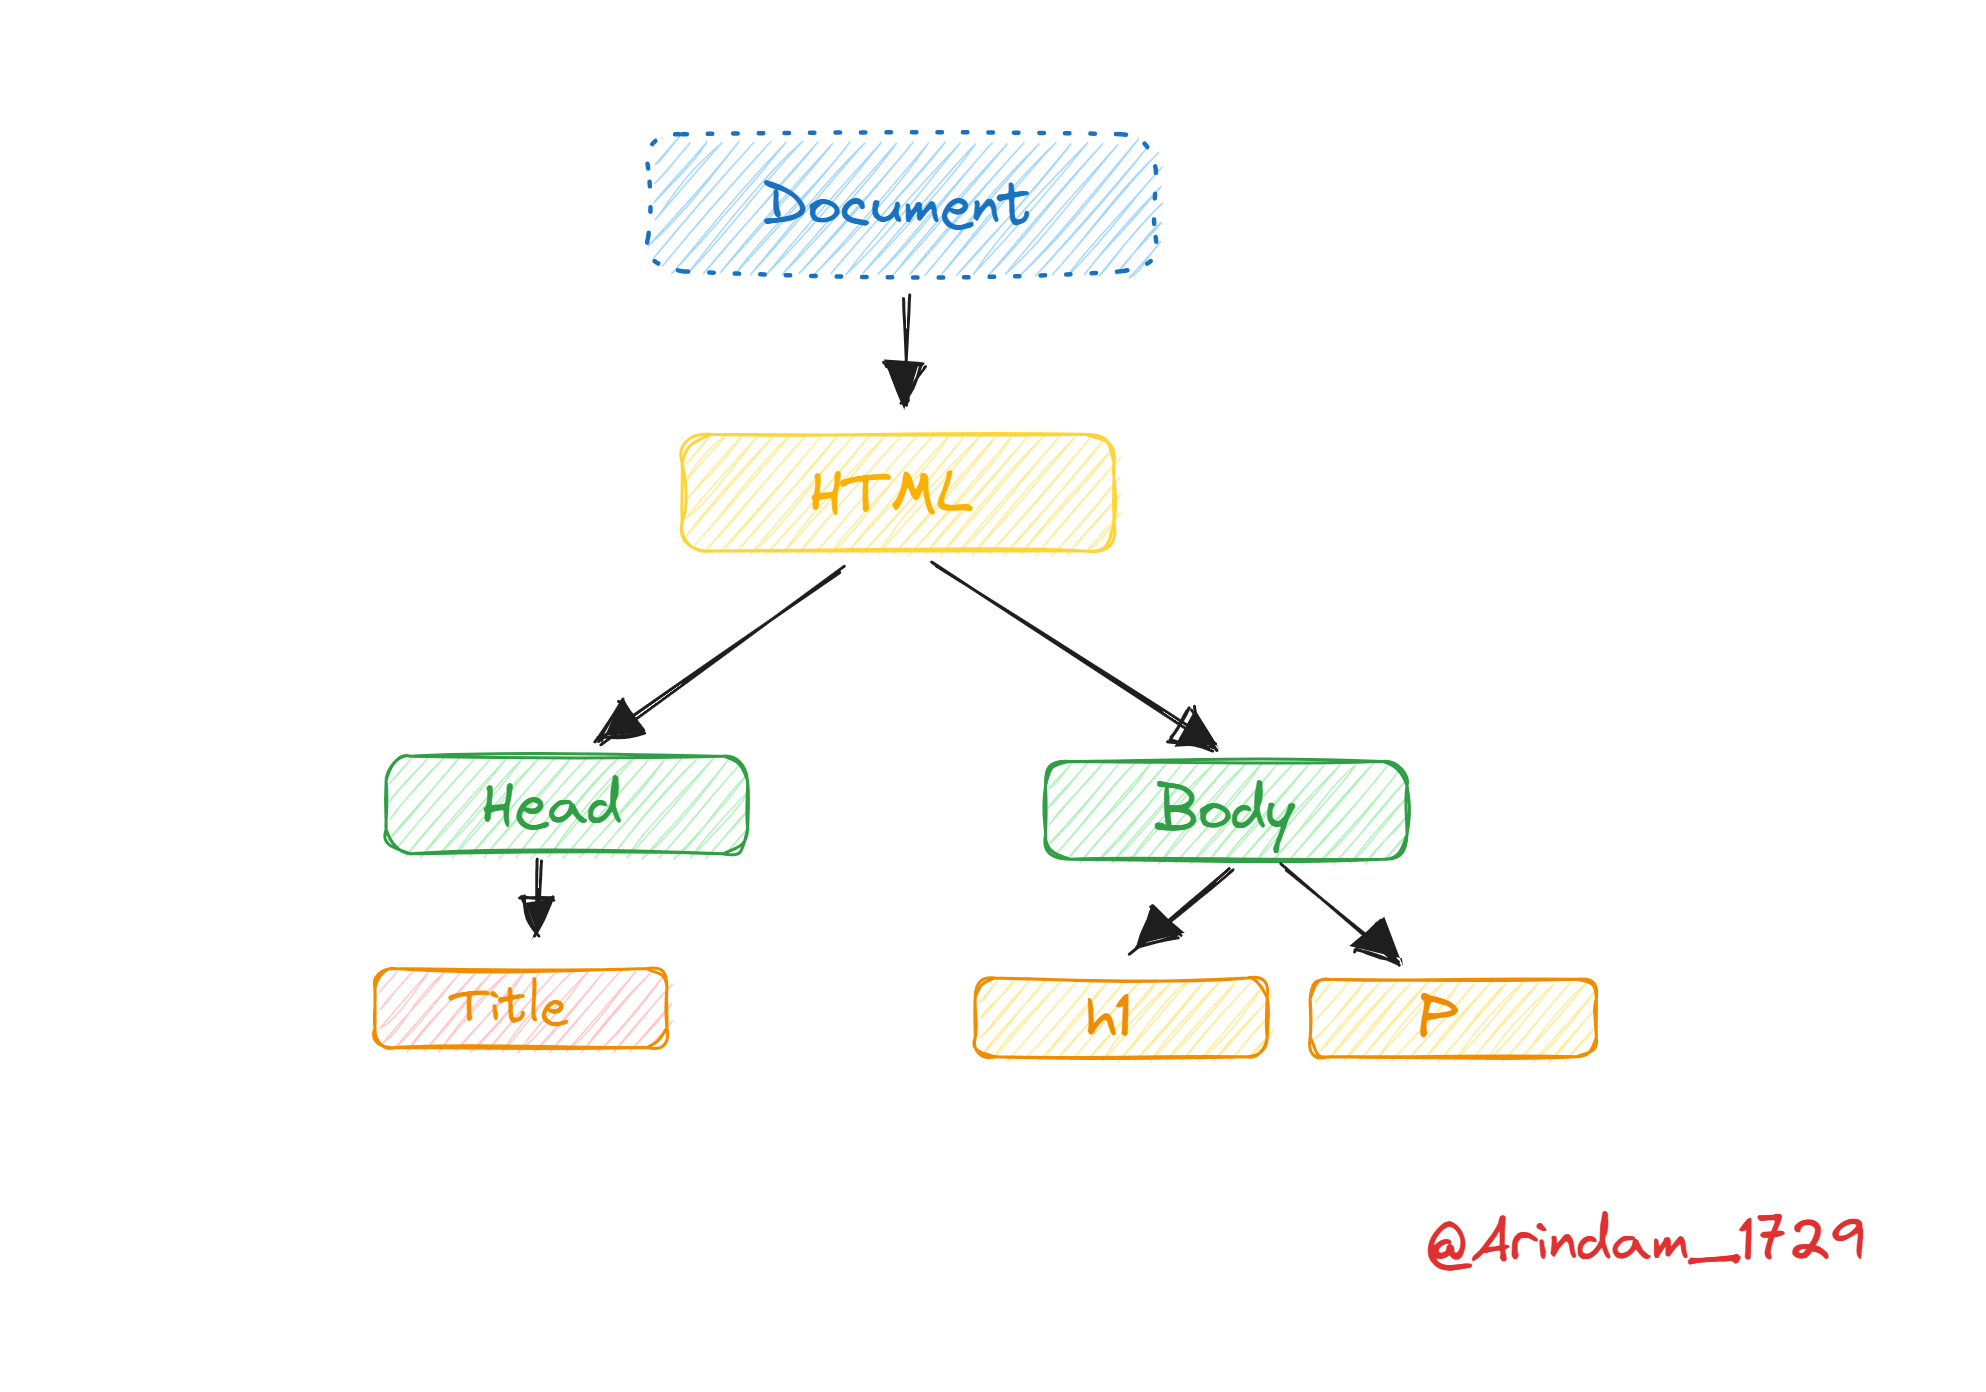
document element. In an HTML document, the document element is the <html> element.Check out this for a better understanding of DOM Tree.
Node Types
Each node in the DOM tree is identified by a node type. JavaScript uses integer numbers to determine the node types. The following table illustrates the node type constants:
| Constant | Value | Description |
Node.ELEMENT_NODE | 1 | An Element node like <p> or <div>. |
Node.TEXT_NODE | 3 | The actual Text inside an Element or Attr. |
Node.CDATA_SECTION_NODE | 4 | A CDATASection, such as <!CDATA[[ … ]]>. |
Node.PROCESSING_INSTRUCTION_NODE | 7 | A ProcessingInstruction of an XML document, such as <?xml-stylesheet … ?>. |
Node.COMMENT_NODE | 8 | A Comment node, such as <!-- … -->. |
Node.DOCUMENT_NODE | 9 | A Document node. |
Node.DOCUMENT_TYPE_NODE | 10 | A DocumentType node, such as <!DOCTYPE html>. |
Node.DOCUMENT_FRAGMENT_NODE | 11 | A DocumentFragment node. |
To get the type of node, you use the nodeType property:
node.nodeType
Accessing DOM elements:
To change/manipulate different parts of the website, we need to access those elements. We have four methods in Javascript to Access elements. They are:
getElementById,getElementsByClass,querySelector,querySelectorAll.
1. getElementById() method:
It's the most common way to access elements. Let's understand this with an example:
const first = document.getElementById('id_name')
Here We are accessing the element that has the id "id_name" and printing that.
2. getElementByClassName() method:
This method is quite similar to the previous method. With this method, we can access the elements by their class. The getElementsByClassName() method returns an array-like of objects of the child elements with a specified class name.
let elements = document.getElementsByClassName(names);
3. querySelector() method:
The querySelector() method allows us to select the first element that matches one or more CSS selectors.
let element = parentNode.querySelector(selector);
Here, the selector is a CSS selector or a group of CSS selectors.
4. querySelectorAll() method:
It's Similar to querySelectorAll() but unlike querySelectorAll(), It selects all elements that match the selectors.
let element = parentNode.querySelectorAll(selector);
DOM Manipulation:
After accessing the elements, we can also perform various kinds of changes/manipulations with the selected elements. This is a crucial aspect of creating dynamic and interactive web applications.
Now, let's see some common DOM Manipulation Techniques:
1. Creating new Elements:
We can create new elements using document.createElement() method. Let's see one example:
var newDiv = document.createElement("div");
Here we are creating a new div and storing it in a variable named 'newDiv' .
2. Adding text to elements
After creating the new div, we'll add some text to the newly created div.
newDiv.textContent = "Newly added div";
We have used the textContent to add the text content to the div.
3. Adding HTML Snippets to elements:
Just like the previous method, We can also use innerHTML method to add an HTML snippet within the div.
newDiv.innerHTML = '<p>Created new element with innerHTML</p>';
4. Adding element to the parent node:
After creating the newDiv we'll now append it to the parent div using appendChild() method.
Note: The
appendChild()method allows you to add a node to the end of the list of child nodes of a specified parent node.Syntax:
parentNode.appendChild(childNode);The
childNodeis the node to append to the given parent node. TheappendChild()returns the appended child.
document.body.appendChild(newDiv);
Here, The element newDiv is appended/added to the body and this adds the div at the end of the body content.
5. Removing Elements:
Just like appending the element, we can also delete/remove the element from the parent node using removeChild() method.
document.body.removeChild(newDiv);
Here, The element newDiv removed from the parent node (which is body here).
6. Updating Styles:
We can also update the styling of the div using the style property.
newDiv.style.backgroundColor = "lightblue";
This will set the background color of the newDiv as lightblue.
7. Event Handling:
Another key aspect of DOM manipulation is responding to user interaction. That means when the user performs different actions (clicks, key presses, or form submissions.), the program will respond accordingly.
We handle the event using event listeners.
Let's see one example:
var button = document.querySelector("button");
button.addEventListener("click", function() {
    alert("Button clicked!");
});
Here, when the user clicks the button, it will show an alert message that "button clicked"
Conclusion:
If you found this blog post helpful, please consider sharing it with others who might benefit. You can also follow me for more content on Javascript, React, and other web Development topics.
For Paid collaboration mail me at : arindammajumder2020@gmail.com
Connect with me on Twitter, LinkedIn, Youtube and GitHub.
Thank you for Reading :)