Table of contents
Introduction
Git is one of the most important and most used open-source software packages on the internet. If you want to get started with Git, or if you want to improve your Git skills, this blog is for you. In this blog, we'll discuss the basics of Git for beginners. We'll cover the basics of Git, such as creating a repository, adding files, and committing changes. We'll also discuss some of the most common Git commands. So if you're ready to learn about Git, keep reading!
Some Basic Linux Commands
mkdir folder/: Make directorycd folder/: Change directoryrmdir folder/: Remove directoryls: List directorypwd: Print working directorytouch text.txt: Creates text.txtrm text.txt: Removes text.txtmv a.txt folder: moves a.txt to Folderhistory: History of commandsclear: Clears terminal
Git Configuration
For the first time, we use Git, we must tell Git about us.All commits we make have information about us.
git config -- global user.name: provides our name to Git$ git config -- global user.name "User_Name"
git config -- global user.email: provides our email to Git$ git config -- global user.email "Useremail@test.com"
If you want to save details only on your system, change
--globalto--system.If you want to save details only in current repository,change
--globalto--local.git config –global alias: Create a shortcut for the Git command.git config --list: displays a list of configured credentials
Tracking Repository
After making files, we have to track them.
git status: Displays the state of the current directory.A newly created project isn't initialized with git.git init: Initializes an empty git repository.A new .git folder is auto-generated. Use ls-a to list all files and folders in the directory.This folder (.git) is hidden.Now git status will say "files are untracked".
git add -A: All files added to the staging areagit add file.py: Only this file was added to the staging area.git commit -m "Initial Commit": All files committed!Now git status says that the working tree is clean which means everything is fine.
On modifying a file, the git status says the same.
git commit: This opens up an active vim editor. Press 'i' them put the commit messagegit log: Displays a list of commits.
Tagging
Git can tag some particular points in repository history as important. This marks a release version.
git tag -a v.1.0 -m "first version of software"
it creates a tag of v.1.0 with this name.
*Note:* We can do multiple tags
git tag : Displays list of tags.
rm -rf .git : Deletes .git folder {Use this command very carefully}
git commit -a -m "My Commit" : Add files to the staging area and commit them.
Untracked files do not support this command.
Git Clone Command
The git clone is a command-line utility, used to make a local copy of a remote repository. It accesses the repository through a remote URL.
Usually, the original repository is located on a remote server, often from a Git service like GitHub, Bitbucket, or GitLab. The remote repository URL is referred to as the origin.
Syntax:
$ git clone

Git Clone Repository
Suppose, you want to clone a repository from GitHub or have an existing repository owned by any other user to which you would like to contribute. The steps to clone a repository are as follows:
Open GitHub and navigate to the main page of the repository.
Under the repository name, click on Clone or Download.
Select the Clone with HTTPs section and copy the clone URL for the repository. For the empty repository, you can copy the repository page URL from your browser and skip to the next step.
Open Git Bash and change the current working directory to your desired location where you want to create the local copy of the repository.
Use the git clone command with the repository URL to make a copy of the remote repository. See the below command:
$ git clone github.com/ImDwivedi1/Git-Example.git Now, Press Enter. Hence, your local cloned repository will be created. See the below output: 
Cloning a Repository into a Specific Local Folder
Git allows cloning the repository into a specific directory without switching to that particular directory. You can specify that directory as the next command-line argument in the git clone command. See the below command:
$ git clone https://github.com/ImDwivedi1/Git-Example.git "new folder(2)"

The given command does the same thing as the previous one, but the target directory is switched to the specified directory.
Git Clone Branch
To make a clone branch, you need to specify the branch name with the -b command. Below is the syntax of the command to clone the specific git branch: Syntax:
$ git clone -b {branch name} {Repository URL}>
See the below command:
$ git clone -b master https://github.com/ImDwivedi1/Git-Example.git "new folder(2)"

In the given output, only the master branch is cloned from the principal repository Git -Example.
Pushing file(s) to GitHub
We can push our code to GitHub from bash [It is recommended that we have nothing to commit]
*Creating a new repository:* You need to create a new repository and click on the plus sign. Fill up all the required details, i.e., repository name, and description, and also make the repository public this time as it is free.
*Open your Git Bash*
*Create your local project on your desktop directed towards a current working directory: Move to the specific path in your local computer by
cd 'path_name'. Thecdthe command is used to change to the working directory in your operating system, and to locate your file,'path_name', i.e.,C:/Users/Dell/Downloads/FaceDetect-masterneeds to be given. This command can identify the required file that you are looking to work with.Initialize the git repository: Initialize the git repository using
git initthe command**Add the file to the new local repository: Use
git add .in your bash to add all the files to the given folder. Usegit statusin your bash to view all the files that are going to be staged to the first commit.Commit the files staged in your local repository by writing a commit message
Copy your remote repository's URL from GitHub:
The HTTPS or URL is copied from the given GitHub account, which is the place of the remote repository. 
Add the URL copied, which is your remote repository to where your local content from your repository is pushed
git remote add origin 'your_url_name'
Push the code in your local repository to GitHub
git push -u origin master Then Fill in your GitHub username and password. 
View your files in your repository hosted on GitHub
PULL Request
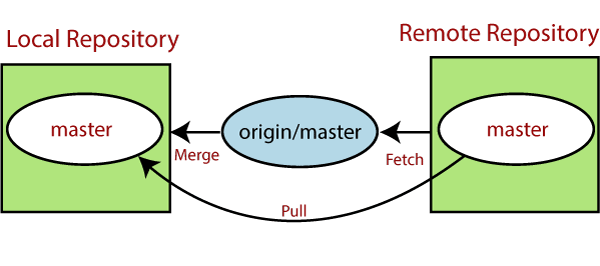
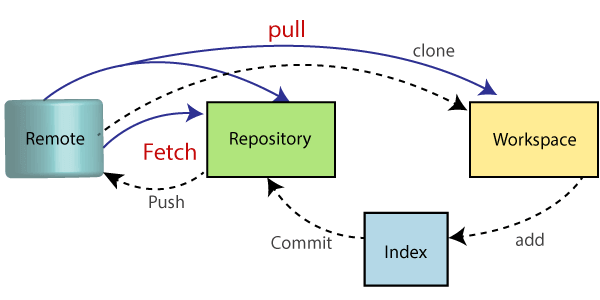
If you make a change in a repository, GIT PULL can allow others to view the changes.
The simple command to PULL from a branch is:
git pull 'remote_name' 'branch_name'

The below figure demonstrates how pull acts between different locations and how it is similar or dissimilar to other related commands

PULL Request through Command Line
Fork the Repository :
The "Fork' is a copy of the main Repository. We can change the Repo by adding & deleting something. The change will not affect the main repo. To add your changes to the main repo You have to make a Pull Request. 
**Open your bash in your computer: **
You need to move to the required path or folder by using the cd command, and the content can be viewed by using the
lscommand, which will list all of the present files in the directory, and in our case you can see the 'README.md' is present. **Make a new branch: **
You can create a new branch by using the
git checkout -b 'branch_name'**Make a change by using Vim from bash or direct replacement from the original README file**
**Adding and Committing a file to the repository**
**Push the repository to the GitHub**
You need to push the content by:
git push origin 'branch_name'**PULL request for a specific branch on GitHub: **
You can move to your repository in GitHub and see that there is a new branch. Alternatively, you can do a ``` git pull-request ``` in the command line and complete the PULL Request to GitHub, where it will force push your current branch to a remote repository. 
**Open a Pull request: **
You need to click the button on "Create pull request," to finish the action. 
PULL Request through GitHub Desktop
**Cloning and Opening to Desktop: **
A project is cloned and click to "Open in Desktop". 
**Create a new branch : **
A new branch, "fix-typo-imp" is created. 
**Make a change in the imp file from the text editor: **
ou can change the content of the imp file, fix a typo, and add some text.
**Commit the changes: **
A commit message written and "Commit to fix-typo-imp" is clicked. 
**Publish the branch: **
You can now publish the branch, which pushes the commit to GitHub. 
**Create a PULL Request: **
You can now make a PULL request by clicking "Create pull request".  
You need to move to the main page of the repository and click "Pull requests".
You need to click 'Closed' to see the lists of all the PULL Requests that you've made, but there is only one at the moment which needs to be selected. It is the one related to your branch that you want to delete.
You can now click 'Delete branch' to complete the action.
 The owner of the repository can view all the commits, pull request, etc., made by collaborators and others. The changes made by someone can be significant, quick fixes for a bug, errors, etc., and are added to the project. 
The owner now clicks "Merge pull request". Also, he/she will click "Confirm merge" through the following process.
The last change made to the README.md file with a corrected typo is below.
Conclusion
Thank you for reading this complete guide to version control on Git. Whether you're a beginner or a more experienced user, we hope that this guide has helped you understand the basics of Git. We'll be adding more information on Git. If you found this guide helpful, please like, share, and follow us for more blog posts like this in the future.
If you found this blog interesting do tweet about it and tag me!
My Twitter: https://twitter.com/intent/follow?screen_name=Arindam_1729
